dual boot installation

When you run into problems installing MX Linux XFCE
Message
Author
newbee85
Posts: 5
Joined: Tue Dec 10, 2024 8:31 am

dual boot installation

#1 Post by newbee85 »

Hello,
I have an issue with linux installation
in het video here on how to create a post it says that quick system info is in the menu, I see a tab below with options, but I can't click it, I use firefox, (also tryed on chrome)
therefore I post here some info, and will update if I find out how to post it correctly:
Dell Vostro 3559
Operating System
Windows 10 Home 64-bit
CPU
Intel Core i5 @ 2.30GHz 62 °C
Skylake-U/Y 14nm Technology
RAM
16,0GB Dual-Channel DDR3 @ 798MHz (11-11-11-28)
Motherboard
Dell Inc. 047TR1 (U3E1)
Graphics
Generic PnP Monitor (1366x768@60Hz)
Intel HD Graphics 520 (Dell)
Storage
465GB Seagate ST500LT012-1DG142 (SATA ) 27 °C
465GB TOSHIBA External USB 3.0 USB Device (USB (SATA) ) 26 °C
Optical Drives
PLDS DVD+-RW DU-8A5LH


I downloaded mx linus two times:
1 https://sourceforge.net/projects/mx-lin ... o/download
2 https://sourceforge.net/projects/mx-lin ... o/download

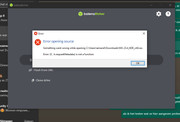
I donwloade rufus: with download one I got the message: withdraw bootloader detected (is this important?)
2 I canot select this in rufus

Then I try to test linux on my system with a live system, but got the message as submitted
Image

I hope you can help :) Thanx

User avatar
fehlix
Developer
Posts: 12868
Joined: Wed Apr 11, 2018 5:09 pm

Re: dual boot installation

#2 Post by fehlix »

newbee85 wrote: Mon Dec 16, 2024 9:44 am Hello,
I have an issue with linux installation
in het video here on how to create a post it says that quick system info is in the menu, I see a tab below with options, but I can't click it, I use firefox, (also tryed on chrome)
therefore I post here some info, and will update if I find out how to post it correctly:
Not sure haven't used windows and Rufus for a while.
But in case they offer to use "ISO/dump" mode, I'd prefer this one.
Also BalenaEtcher is writing ISO-in dump mode onto the USB.
Not sure why you trying to use an 3 month old ISO, where we have a brand new
official ISO snapshot available: MX-23.4_December_KDE.iso.
https://sourceforge.net/projects/mx-lin ... Snapshots/
Also don't forget to verify the downloaded ISO, either with the sha512 checksum file or even better with the provided signature file.

newbee85
Posts: 5
Joined: Tue Dec 10, 2024 8:31 am

Re: dual boot installation

#3 Post by newbee85 »

fehlix wrote: Mon Dec 16, 2024 11:03 am
newbee85 wrote: Mon Dec 16, 2024 9:44 am
Also don't forget to verify the downloaded ISO, either with the sha512 checksum file or even better with the provided signature file.
how do you do you do that?

maybe I need to ad: like my nickname suggest, I'm completely new to linux

I will try again with the link you give

User avatar
j2mcgreg
Global Moderator
Posts: 7116
Joined: Tue Oct 23, 2007 12:04 pm

Re: dual boot installation

#4 Post by j2mcgreg »

@newbee85
I suggest that you follow this guide to dual booting created by our own @FullScale4Me
https://fullscale4me.com/Dual-Boot-MX-L ... -Guide.pdf
HP 15; ryzen 3 5300U APU; 500 Gb SSD; 8GB ram
HP 17; ryzen 3 3200; 500 GB SSD; 12 GB ram
Idea Center 3; 12 gen i5; 256 GB ssd;

In Linux, newer isn't always better. The best solution is the one that works.

User avatar
fehlix
Developer
Posts: 12868
Joined: Wed Apr 11, 2018 5:09 pm

Re: dual boot installation

#5 Post by fehlix »

newbee85 wrote: Mon Dec 16, 2024 1:39 pm
fehlix wrote: Mon Dec 16, 2024 11:03 am Also don't forget to verify the downloaded ISO, either with the sha512 checksum file or even better with the provided signature file.
how do you do you do that?
In case you don't have Linux already, you can verify the checksums provided this way on Windows:
Probably easiest with an example:
* Download both the ISO and the checksum file, for official snapshot iso's we use sha512 checksums:

Code: Select all

iso file :	MX-23.4_December_x64.iso
sha512sum:	MX-23.4_December_x64.iso.sha512
* Open within the download folder where both files have been saved a "Terminal"/"Commandline", suggest to open the PowerShell terminal:
On the PS-prompt:
First way, using build-in tool "certutil" with this command:

Code: Select all

certutil -hashfile .\MX-23.4_December_x64.iso SHA512
which should calculate and display a long checksum like this:

Code: Select all

SHA512-Hash of .\MX-23.4_December_x64.iso:
6e975cdde8bb4fbb96d6dab4050384617ddd9917ea754b6d47fc6d4caef5b2d46edef65d4f9ac6c13f93df3629b7a3a8cf506fd5b2ff7009a6e55e125e586709
alternatively use a powershell function to calculate the hash-sum this way:

Code: Select all

(Get-FileHash .\MX-23.4_December_x64.iso -Algorithm SHA512).hash
6E975CDDE8BB4FBB96D6DAB4050384617DDD9917EA754B6D47FC6D4CAEF5B2D46EDEF65D4F9AC6C13F93DF3629B7A3A8CF506FD5B2FF7009A6E55E125E586709
Now display the content of the downloaded .sha512 file with "type" command:

Code: Select all

type MX-23.4_December_x64.iso.sha512
6e975cdde8bb4fbb96d6dab4050384617ddd9917ea754b6d47fc6d4caef5b2d46edef65d4f9ac6c13f93df3629b7a3a8cf506fd5b2ff7009a6e55e125e586709  MX-23.4_December_x64.iso
You can now manually /visually compare this long string, which should be identical.

Alternatively instead of trying to compare those long checksum strings, let PowerShell do this with:

Code: Select all

(Get-FileHash .\MX-23.4_December_x64.iso -Algorithm SHA512).hash -eq "6e975cdde8bb4fbb96d6dab4050384617ddd9917ea754b6d47fc6d4caef5b2d46edef65d4f9ac6c13f93df3629b7a3a8cf506fd5b2ff7009a6e55e125e586709"
True

Both checksum - the calculated and the provided would match and you get "True".
You copy/paste from the output of the "type" command (Click the checksum to select, Enter to copy, and Right-click to paste.)

In addition to the checksum verification, there are also pgp/gpg/GnuPG-signature files provide to download.
To perform a gpg-sIgnature verification of the iso-file on WIndows some tools would need to be installed as Windows does not
provide a build-in tool do do this. E.g use Gpg4win https://www.gpg4win.org/

On Linux
To perform checksum verification run the tools sha512sum like this:

Code: Select all

sha512sum --check MX-23.4_December_x64.iso.sha512
MX-23.4_December_x64.iso: OK
A signature verification on MX Linux, where we have gpgv verifier tool installed looks like this:
using this way:
gpgv sig-file followed by iso-file

Code: Select all

gpgv  MX-23.4_December_x64.iso.sig  MX-23.4_December_x64.iso
and would display this

Code: Select all

gpgv: Signature made Sun Dec 15 17:38:41 2024 EST
gpgv:                using RSA key F27753A18E92E3937E6335E770938C780679EE98
gpgv: Good signature from "Adrian <adrian@mxlinux.org>"
but only if the file would match to the signature provided.
Also the above signature shows that the "signer" is really the one we know and who has generated the snapshot.
You would first get the signers public-signature key imported into the gpg keyring.
More about this gpg-signaure file verification for MX Linux and how to import the public signing key
here at the MX Linux Wiki https://mxlinux.org/wiki/system/signed-iso-files/
HTH
User avatar
DukeComposed
Posts: 1499
Joined: Thu Mar 16, 2023 1:57 pm

Re: dual boot installation

#6 Post by DukeComposed »

fehlix wrote: Mon Dec 16, 2024 6:33 pm In case you don't have Linux already, you can verify the checksums provided this way on Windows:
Probably easiest with an example:
* Download both the ISO and the checksum file, for official snapshot iso's we use sha512 checksums:

Code: Select all

iso file :	MX-23.4_December_x64.iso
sha512sum:	MX-23.4_December_x64.iso.sha512
This is an excellent tutorial for verifying MX downloads. There's also checksums for the official ISOs on the website.

One of the things I noticed is that when running recent versions of Rufus (I tested this with v4.6-portable), you can have Rufus read and compute multiple checksums automatically. By clicking the small circle with a checkmark inside it that is to the left of the "SELECT" button, Rufus will compute the MD5, SHA-1, SHA-256, and SHA-512 checksums of the selected file.

Pick one of these, such as the SHA-256 alphanumeric string, and compare it to the SHA-256 of the ISO you've downloaded and ensure that they match. If they don't, your USB won't work as expected.

newbee85
Posts: 5
Joined: Tue Dec 10, 2024 8:31 am

Re: dual boot installation

#7 Post by newbee85 »

It seems like these are different ways to go?
I started this one: https://fullscale4me.com/Dual-Boot-MX-L ... -Guide.pdf
And it says:
Consider implementing a data sharing area between Windows and MX Linux when you are
setting up Dual Boot. Use FAT32, ExFAT or NTFS format. Most USB drive come as FAT32

I have no idea what that is about?

User avatar
DukeComposed
Posts: 1499
Joined: Thu Mar 16, 2023 1:57 pm

Re: dual boot installation

#8 Post by DukeComposed »

newbee85 wrote: Tue Dec 17, 2024 2:33 am I started this one: https://fullscale4me.com/Dual-Boot-MX-L ... -Guide.pdf
And it says:
Consider implementing a data sharing area between Windows and MX Linux when you are
setting up Dual Boot. Use FAT32, ExFAT or NTFS format. Most USB drive come as FAT32

I have no idea what that is about?
FullScale4Me's guide quite literally gives three explanations of what that's about. The section you cited, in full, reads:
Data Sharing area between Windows & Linux

Consider implementing a data sharing area between Windows and MX Linux when you are setting up Dual Boot. Use FAT32, ExFAT or NTFS format. Most USB drive come as FAT32.

Suggested name: MyData

• Create a 3rd partition that is visible to both after the Windows disk partition.
• Setup a Cloud Storage account: Google Drive, OneDrive, DropBox, Mega, etc.
• Purchase an external Thumb drive or SSD hard drive caddy to exchange files.
If you don't intend to transfer Windows files to the Linux partition or transfer Linux files to the Windows partition, then you can ignore this step. You can set up cloud storage later if you want.

EDIT: typo

newbee85
Posts: 5
Joined: Tue Dec 10, 2024 8:31 am

Re: dual boot installation

#9 Post by newbee85 »

ok, I went to the next step, iff i type BitLocker or manage BitLocker in the search box it only find results on the web,so I guess I don't have it?
the other step is backup windows keys, : they mean the windows product keys? I make a backup of windows, so I guess it is not needed, next step is: Shrink Windows C drive partition, I have enough space, so I guess that is not needed?

User avatar
DukeComposed
Posts: 1499
Joined: Thu Mar 16, 2023 1:57 pm

Re: dual boot installation

#10 Post by DukeComposed »

newbee85 wrote: Tue Dec 17, 2024 3:56 am iff i type BitLocker or manage BitLocker in the search box it only find results on the web,so I guess I don't have it?
Steps to disable BitLocker are in FullScale4Me's guide under section 3.4. You mentioned you're running Windows 10 Home, so this section is relevant to you:
Dual Boot: MX Linux & Windows – Installation Guide wrote: 3.4 Disable BitLocker
BitLocker must be Disabled before doing any Hard Drive reconfiguration tasks.

• Windows 11 Pro – BitLocker is enabled and should be disabled.
• Windows 11 Home – Microsoft has started force enabling BitLocker (as of 2Q 2024).
• Windows 10 – at the time of writing has BitLocker is not enabled.
If you want to know, precisely, the BitLocker status of your Windows volume, you can run "manage-bde -status" from an elevated command prompt and check the Protection Status. There is ample documentation online on other ways to verify this.
newbee85 wrote: Tue Dec 17, 2024 3:56 am next step is: Shrink Windows C drive partition, I have enough space, so I guess that is not needed?
Be specific here. What, precisely, does "enough space" mean? You know from section 3.71 of the guide what the steps are to add a new partition for installing MX Linux. FullScale4Me has even included screenshots so you can compare your disk layout against the example in the guide. You haven't given any information about your partitions, so I can't guess if you have enough unallocated space on the disk to add a new partition or not. FullScale[0] is clear on how much free space a hard disk needs to have:
Dual Boot: MX Linux & Windows – Installation Guide wrote: 3.7 Freeing space for Linux on the Windows Drive C
MX Linux needs a minimum of 8.5 Gb of free space and preferably 20 Gb is recommended.
I want to be very clear here. This does not mean you need 20 gigs of free space on your Windows C: drive. It means you need your Windows C: drive to be at least 20 gigs smaller than the total capacity of the hard disk.

In other words, if the total capacity of the hard disk is 465 GB, the C: drive can't be larger than about 440 GB. Dual-booting means installing a new OS alongside Windows, not inside Windows. You are going to create that space so that the MX Linux installer can find it.

[0] I've got to start abbreviating this. Apologies.

Post Reply

Return to “Installation”