I already tested and successfully created a frugal install via the Live Medium Boot Screen (Customize Boot) with the settings "from=usb" and "f_static_root".
Here is a quick overview
- version: Linux MX-19.3 x64
- Laptop with Windows 7
- internal HDD that has 2 partitions, C: and D:
- C: contains Windows 7 and programs
- D: is my storage partition that contains general files/media
My goal
- using MX Linux as persistent LiveUSB, so that everytime I put in the USB stick it starts MX Linux and all changes during the session are saved
- that's why I want to use the frugal option as using an internal HDD is a lot faster than using the USB flash drive
- use the internal disk partition D: as the frugal disk
Question 1
The files of the frugal install are saved to the internal D:\ drive. How can I keep them in a specific path/folder (such as D:\MXLinux)? As there are 3 different files/folders that are created (antix folder, liveusb folder, swap file), it would be nice to have them all together in one place.
Question 2
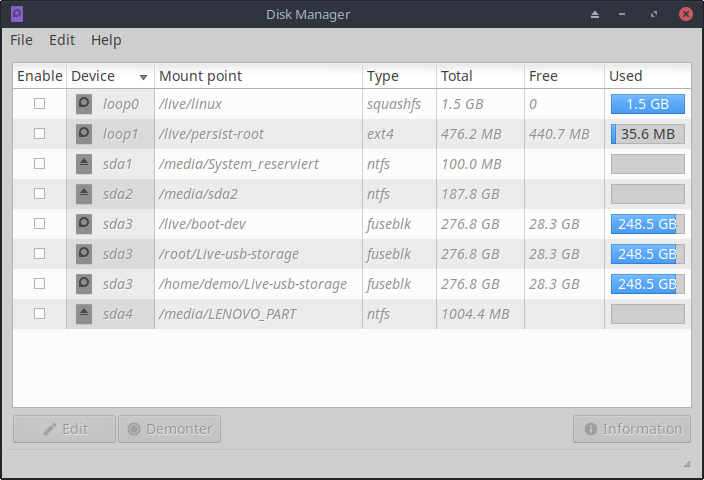
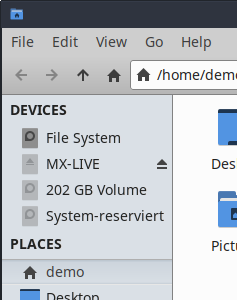
After creating the frugal install and booting into MX Linux, the D: drive is no longer listed under Devices in the File Manager (C: is listed though). How can I access the files in D:\?
Question 3
Now everytime I boot into MX Linux via LiveUSB, it's searching for the antix-frugal label, as I don't want to rename the label for my D: drive ( I'm unsure wheather it will cause issues on Windows or if the D: drive will be renamed there). I need to select the D: drive manually each time. How can this step be skipped, so it automatically boots to Linux MX?
Quick System Info
Code: Select all
System:    Host: <filter> Kernel: 4.19.0-12-amd64 x86_64 bits: 64 compiler: gcc v: 8.3.0
           parameters: BOOT_IMAGE=/antiX/vmlinuz quiet splasht nosplash tz=Europe/Berlin
           from=usb f_static_root
           Desktop: Xfce 4.14.2 tk: Gtk 3.24.5 info: xfce4-panel wm: xfwm4 dm: LightDM 1.26.0
           Distro: MX-19.3_x64 patito feo November 11  2020 base: Debian GNU/Linux 10 (buster)
Machine:   Type: Laptop System: LENOVO product: 7505 v: Lenovo IdeaPad N581 serial: <filter>
           Chassis: type: 10 v: Lenovo IdeaPad N581 serial: <filter>
           Mobo: LENOVO model: Product Name v: Mainboard version serial: <filter> UEFI: LENOVO
           v: 5ECN42WW(V4.01) date: 03/14/2013
Battery:   ID-1: BAT1 charge: 2.8 Wh condition: 2.8/4.0 Wh (69%) volts: 12.0/10.8
           model: LG PABAS0241231 type: Li-ion serial: <filter> status: Full
CPU:       Topology: Dual Core model: Intel Core i5-3230M bits: 64 type: MT MCP arch: Ivy Bridge
           family: 6 model-id: 3A (58) stepping: 9 microcode: 15 L2 cache: 3072 KiB
           flags: avx lm nx pae sse sse2 sse3 sse4_1 sse4_2 ssse3 vmx bogomips: 20752
           Speed: 1197 MHz min/max: 1200/3200 MHz Core speeds (MHz): 1: 1197 2: 1197 3: 1197
           4: 1197
           Vulnerabilities: Type: itlb_multihit status: KVM: Vulnerable
           Type: l1tf mitigation: PTE Inversion
           Type: mds
           status: Vulnerable: Clear CPU buffers attempted, no microcode; SMT vulnerable
           Type: meltdown mitigation: PTI
           Type: spec_store_bypass status: Vulnerable
           Type: spectre_v1 mitigation: usercopy/swapgs barriers and __user pointer sanitization
           Type: spectre_v2 mitigation: Full generic retpoline, STIBP: disabled, RSB filling
           Type: srbds status: Vulnerable: No microcode
           Type: tsx_async_abort status: Not affected
Graphics:  Device-1: Intel 3rd Gen Core processor Graphics vendor: Lenovo driver: i915 v: kernel
           bus ID: 00:02.0 chip ID: 8086:0166
           Display: x11 server: X.Org 1.20.4 driver: modesetting unloaded: fbdev,vesa
           resolution: 1366x768~60Hz
           OpenGL: renderer: Mesa DRI Intel Ivybridge Mobile v: 4.2 Mesa 18.3.6 compat-v: 3.0
           direct render: Yes
Audio:     Device-1: Intel 7 Series/C216 Family High Definition Audio vendor: Lenovo
           driver: snd_hda_intel v: kernel bus ID: 00:1b.0 chip ID: 8086:1e20
           Sound Server: ALSA v: k4.19.0-12-amd64
Network:   Device-1: Qualcomm Atheros AR8161 Gigabit Ethernet vendor: Lenovo driver: alx
           v: kernel port: 2000 bus ID: 01:00.0 chip ID: 1969:1091
           IF: eth0 state: down mac: <filter>
           Device-2: Qualcomm Atheros AR9485 Wireless Network Adapter vendor: Lenovo
           driver: ath9k v: kernel port: 2000 bus ID: 02:00.0 chip ID: 168c:0032
           IF: wlan0 state: down mac: <filter>
Drives:    Local Storage: total: 481.05 GiB used: 34.0 MiB (0.0%)
           ID-1: /dev/sda vendor: Seagate model: ST500LT012-9WS142 size: 465.76 GiB block size:
           physical: 4096 B logical: 512 B speed: 3.0 Gb/s rotation: 5400 rpm serial: <filter>
           rev: LVM1 scheme: MBR
           ID-2: /dev/sdb type: USB vendor: Intenso model: Alu Line size: 15.29 GiB block size:
           physical: 512 B logical: 512 B serial: <filter> rev: 8.07 scheme: MBR
Partition: ID-1: / raw size: N/A size: 476.2 MiB used: 34.0 MiB (7.2%) fs: overlay
           source: ERR-102
Sensors:   System Temperatures: cpu: 43.0 C mobo: N/A
           Fan Speeds (RPM): N/A
Repos:     No active apt repos in: /etc/apt/sources.list
           Active apt repos in: /etc/apt/sources.list.d/debian-stable-updates.list
           1: deb http://deb.debian.org/debian buster-updates main contrib non-free
           Active apt repos in: /etc/apt/sources.list.d/debian.list
           1: deb http://deb.debian.org/debian buster main contrib non-free
           2: deb http://deb.debian.org/debian-security buster/updates main contrib non-free
           Active apt repos in: /etc/apt/sources.list.d/mx.list
           1: deb http://ftp.halifax.rwth-aachen.de/mxlinux/packages/mx/repo/ buster main non-free
           No active apt repos in: /etc/apt/sources.list.d/various.list
Info:      Processes: 205 Uptime: 1m Memory: 3.76 GiB used: 502.5 MiB (13.1%) Init: SysVinit
           v: 2.93 runlevel: 5 default: 5 Compilers: gcc: 8.3.0 alt: 8 Shell: quick-system-in
           running in: quick-system-in inxi: 3.0.36