The Samba Wiki entry

Topics relating to MX Docs and MX Videos
Message
Author
BitterTruth
Posts: 733
Joined: Tue Sep 22, 2020 7:36 pm

Re: The Samba Wiki entry

#11 Post by BitterTruth »

Samba does not have a Network Discovery Server. So you need to install avahi (if you have a linux only networks).

@dolphin_oracle install avahi-daemon on both server and clients. They'll be discoverable in the browsers (thunar then at least)
linux <------------------->linux

For Windows, you need:
WSDD

Code: Select all

sudo apt install wsdd
Web Service Discovery host daemon. This enables (Samba) hosts, like your local NAS device, to be found by Web Service Discovery Clients like Windows.

It also implements the client side of the discovery protocol which allows to search for Windows machines and other devices implementing WSD. This mode of operation is called discovery mode.
It goes without saying that samba, avahi and wsdd need to enabled and set to start on boot AND that you have the same WORKGROUP name set in the smb.conf file.

User avatar
CharlesV
Administrator
Posts: 8000
Joined: Sun Jul 07, 2019 5:11 pm

Re: The Samba Wiki entry

#12 Post by CharlesV »

You do not *need* to install avahi for Samba to work. Samba has discovery methods and will find other samba machines if they are all configured properly.

The issue with window machines is different and wsdd is seriously flaky.

I am almost done with my SMB network scanning script and will post it in the next couple of days - I just tacked on nicer ui connection and should have it thoroughly tested by late today.
*QSI = Quick System Info from menu (Copy for Forum)
*MXPI = MX Package Installer
*Please check the solved checkbox on the post that solved it.
*Linux -This is the way!

BitterTruth
Posts: 733
Joined: Tue Sep 22, 2020 7:36 pm

Re: The Samba Wiki entry

#13 Post by BitterTruth »

CharlesV wrote: Wed Aug 27, 2025 9:22 am You do not *need* to install avahi for Samba to work.
agreed. but to make it discoverable you will at least that's what I had to do to get a void vm to be able to see an alpine vm share in thunar. Don't get me wrong, I could access the share by typing:

smb://ip-address-of-samba-server

but it wasn't visible until I had avahi installed on both.
CharlesV wrote: Wed Aug 27, 2025 9:22 am Samba has discovery methods and will find other samba machines if they are all configured properly.
I'd be curious to know what those are. The documentation is all over the place on samba with all sorts of configurations floating around. Some sources say it supports discovery independantly whilst others mention that it is compatible with network discovery tools.

User avatar
FullScale4Me
Posts: 1156
Joined: Fri Jan 08, 2021 11:30 pm

Re: The Samba Wiki entry

#14 Post by FullScale4Me »

BitterTruth wrote: Wed Aug 27, 2025 11:45 am
CharlesV wrote: Wed Aug 27, 2025 9:22 am Samba has discovery methods and will find other samba machines if they are all configured properly.
I'd be curious to know what those are. The documentation is all over the place on samba with all sorts of configurations floating around. Some sources say it supports discovery independantly whilst others mention that it is compatible with network discovery tools.
Avahi (and bonjour too) is very configurable and has a low dependency impact as a mDNS service. I'm surprised more Linux distro's haven't leveraged it now that Windows is mDNS compliant. Not a 'full-featured' discovery mechanism (as Debian configures it) as some would want (for network browsing) but as configured it at least obfuscates the IP to name resolution dilemma for the laypersons.
BitterTruth wrote:I could access the share by typing: smb://ip-address-of-samba-server
Bookmarking after that in File Manager eliminates all future fiddling to find other hosts as it restores the single click (in File Manager) to remote PCs/devices that laypersons crave.

Samba's legacy name resolution and browsing info broadcast messages were depreciated heavily in the Samba 4.11 Samba transition. This was a part of the dropping of SMB1 aka NT1 (and lower) [1] protocol support.

What replaced NT1 was SMB2 and later SMB3. Both are faster (compressed data streams), more secure and (by design) more reliable due to using TCP only. Current implementations only use TCP port 445 with a teeny leak of whispers on UDP 137 if nmbd is installed and running. Going 'back' means a lot [more] of things to watch after. MOST of the common exploits that attack a PC with methods that run before the OS loads propagate locally via SMB1, many times bricking a PC firmware. Don't go there unless you can afford the risk!

KDE >5,27 has built their own 'Network Discovery' underlying subpart of the modules supporting Dolphin that is Microsoft (Win Vista and later) WS-Discovery Service aware. Even Linuxes running SMB 3.x are seen too.

1) SMB1 aka NT1 was a later protocol. What It succeeded: LANMAN2 (Win 98/Win 98SE/Win Me/Win XP), LANMAN1 (Win 95) and CORE & COREPLUS (Window for Workgroups 3.1x/VAX Pathworks/IBM Server).
Michael O'Toole
MX Linux facebook group moderator
Dell OptiPlex 7050 i7-7700, MX Linux 23 Xfce & Win 11 Pro
HP Pavilion P2-1394 i3-2120T, MX Linux 23 Xfce & Win 10 Home
Dell Inspiron N7010 Intel Core i5 M 460, MX Linux 23 Xfce & KDE, Win 10

User avatar
CharlesV
Administrator
Posts: 8000
Joined: Sun Jul 07, 2019 5:11 pm

Re: The Samba Wiki entry

#15 Post by CharlesV »

With the exception of windows machines, I have had no issues with 'browsing' on a samba network. All discovery is built into samba already.

I have four mods to the smb.conf file I do to ALL machines I setup:
1) workgroup = {network_work_group|

2) name resolve order = bcast lmhosts host wins

3) wins support = yes

4) Setup the Shares I want - either using the smb.conf file since I am in there or with the MX Samba utility.

Restart smbd and nmbd services and turn OFF the firewall. (sudo ufw disable )

Test.

If I need the firewall up, then I open the samba ports and test.

ALL my machines POP on this networ - mainly because of the name resolve order. And if I need browsing on a windows machine, then I use my script.
*QSI = Quick System Info from menu (Copy for Forum)
*MXPI = MX Package Installer
*Please check the solved checkbox on the post that solved it.
*Linux -This is the way!

BitterTruth
Posts: 733
Joined: Tue Sep 22, 2020 7:36 pm

Re: The Samba Wiki entry

#16 Post by BitterTruth »

CharlesV wrote: Wed Aug 27, 2025 5:28 pm Restart smbd and nmbd services and turn OFF the firewall. (sudo ufw disable )
It seems to me you are using the older deprecated NETBIOS since you have nmbd service running. I bet if you disabled that at boot your shares would no longer be browseable. It is also why your shares are not visible on windows since windows 10 stopped using netbios and uses mdns.

Samba uses mdns but only to announce it's hostname. It doesn't broadcast it's shares. Hostname lookup and service discovery are 2 subtley distinct parts of 'discovery'. So samba does multicast but only half.

That's why it 'needs' avahi or something similar to do the rest (service discovery).

Windows mdns does the service discovery but not the hostname lookup.

that's why linux needs wsdd so that windows clients can discover samba hosts.

Putting all this together:

Summary:

1) Samba + Netbios + smbd + nmbd -----------> discoverable by some linux and older windows

2) Samba + smbd only + avahi --------------> discoverable linux, mac

3) Samba + smbd + avahi + wsdd -----------------> discoverable by linux, mac, windows

Easy to test:

1) Stop nmbd
2) install and set avahi to start at boot (servers and clients)
3) install and set wsdd to start at boot (server only)
4) edit smb.conf to make sure user is allowed to access shares
5) disable firewall
6) should be browseable (might need to reboot server/clients)

User avatar
CharlesV
Administrator
Posts: 8000
Joined: Sun Jul 07, 2019 5:11 pm

Re: The Samba Wiki entry

#17 Post by CharlesV »

As I said.. when I attempted to use wsdd and wsdd2 I spent several months trying to get it all stable. Some times it would see my windows machines, sometimes not. And avahi was nearly as bad, but not quite.

Still even with these, I have not been able to make browsing windows machines work in a stable fashion when we talk about Thunar - Other utilities sure. (like Dolphin - which uses its own discovery ability. Thunar uses cifs and smb, and there are two bugs that are still today wreaking havoc with it.

I finally gave up and went to a custom script

stable until I stopped using them and went to my custom script. I use a combination of nmap, then probe the machines with smb or nmblookup and gather up the machines and put them into a list. I had not completed the UI really, just tossing them into a list, displaying the list and then clicking them.

But I put a decent UI on it yesterday and last night, and have been testing (and documenting it) today. I should have it posted in an hour ish ? This system has been VERY stable for me and works VERY VERY well.
*QSI = Quick System Info from menu (Copy for Forum)
*MXPI = MX Package Installer
*Please check the solved checkbox on the post that solved it.
*Linux -This is the way!

BitterTruth
Posts: 733
Joined: Tue Sep 22, 2020 7:36 pm

Re: The Samba Wiki entry

#18 Post by BitterTruth »

No doubt, there's always multiple ways of doing something in linux and everyone is comfortable with what suits their own needs.

I have to admit, you have a much bigger setup than me, so I suppose the script makes a lot more sense for you anyway. Personally I can't script, so I tend to spend a bit more time trying to find the laziest solution for my small setups.

It took me a while to sift through all of the historical Samba fluff/baggage, but I think I've got the gist of it. I'll leave a little screenshot from the Samba arch wiki since I think it does a nice job of summarising it up
Image

EDIT:
FullScale4Me wrote: Wed Aug 27, 2025 4:27 pm What replaced NT1 was SMB2 and later SMB3. Both are faster (compressed data streams), more secure and (by design) more reliable due to using TCP only. Current implementations only use TCP port 445 with a teeny leak of whispers on UDP 137 if nmbd is installed and running. Going 'back' means a lot [more] of things to watch after. MOST of the common exploits that attack a PC with methods that run before the OS loads propagate locally via SMB1, many times bricking a PC firmware. Don't go there unless you can afford the risk!
@FullScale4Me Thank you for this very useful to know. I wasn't sure which ports to allow through UFW as I saw 139 mentioned as well, so allowed all traffic through from certain clients via their ips.
Last edited by BitterTruth on Wed Aug 27, 2025 7:17 pm, edited 1 time in total.

User avatar
CharlesV
Administrator
Posts: 8000
Joined: Sun Jul 07, 2019 5:11 pm

Re: The Samba Wiki entry

#19 Post by CharlesV »

That is to have your linux machine show up for a windows machine - not a problem that I have seen...ever... The issue is browsing the network from a linux machine.. and seeing Windows machines.
*QSI = Quick System Info from menu (Copy for Forum)
*MXPI = MX Package Installer
*Please check the solved checkbox on the post that solved it.
*Linux -This is the way!

User avatar
CharlesV
Administrator
Posts: 8000
Joined: Sun Jul 07, 2019 5:11 pm

Re: The Samba Wiki entry

#20 Post by CharlesV »

Here is my SMB Network Scanner.

Frustrated by samba browsing not working in any reliable pattern, I decided to write something that got me browsing SMB machines, and in particular Windows machines on a Linux network!

Wanting to have this ability in both my KDE and XFCE machines, I went after a solution that uses 'clean tech' to find machines open to SMB connections... This SMB Network Scanner is the result.

SMB Network Scanner uses nmap to scan the local network, and then presents SMB hosts in a clickable YAD dialog.

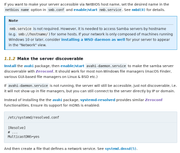
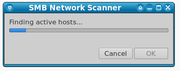
The Scanning Dialog looks like this:

Image

With the resulting Clickable list or Network Machines (Linux AND Windows ) listed:

Image
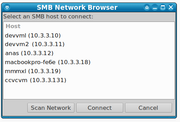
( Yes, the names have been changed to protect the innocent )

Double clicking or highlighting an entry or highlighting and then clicking the connect button, creates the connection in the default file manager, opening that network address.

Dependencies - all can be checked and installed by using the 'install'
parameter when starting the script from the command line.
- nmap
- samba
- yad
- zenity

There are three protocols looked at for every device found, so it takes some time to scan the entire network. So we use a cache file which is instrumental to keep things speedy.

Scanning builds the cache file, which is then used to speed up all future runs. We can rescan, or if the cache file
has been deleted, then we rescan automatically.

I added some command line parameters to get some things done quickly too
- scan - Forces an immediate network scan and then shows the Available machines
- show - Displays the available machines, based on the current cache file
- simple - This was my starting ui, still kind of like it.. so I left it available.
- quick - a Dialog to just show the current network mask and you fill in the last octoid and connect.
- install - Checks and then install the dependencies.

Yes - AI Helped me. I originally had the nmap scan setup and put all machines found into a text file, then worked up the text file to be 'linkable' and I could click on them. This worked great once I figured out to setup a cache file and save the results until I needed to scan again.

Clunky... but affective. Ai helped me put this all into different GUI format, create the 'Scanning' dialog, and smooth out a few issues with default File Managers etc.

The Script and Readme file are attached here, but all you have to do is to save this script, make it executable and then launch it. (I have a custom action in thunar that fires it off. )

Code: Select all

#!/bin/bash

#/*----------------------------------------------------------------------*/
#/*- SMB Network Scanner with YAD GUI 
#/*-      
#/*- Scans network and presents SMB hosts in a clickable YAD dialog
#/*- 
#/*- Double clicking or highlighting an entry and clicking
#/*- the connect button, start the defualt FM, opening 
#/*- that network address. 
#/*- 
#/*- Dependencies:
#/*-   - nmap  - Provide message if not installed
#/*-   - samba - provide message if not installed
#/*-   - yad   - install it if from the command line 
#/*-   - zenity - Provide message if not installed
#/*-   
#/*- Notes:        
#/*-  250826 CV - Version 5 ( see notes )   
#/*----------------------------------------------------------------------*/

#/*----------------------------------------------*/
#/*-         FUNCTION DEFINITIONS               -*/
#/*----------------------------------------------*/

#/*----------------------------------------------*/
#/*-  Function to install dependencies
#/*----------------------------------------------*/
install_dependencies() {
	#/*-  Check if YAD is installed
	if ! command -v yad &> /dev/null; then
		echo -e "${RED}YAD does not appear to be installed. Installing...${NC}"
		sudo apt install yad -y
	fi

	#/*-  Check if zenity is installed
	if ! command -v zenity &> /dev/null; then
		echo -e "${RED}Zenity does not appear to be installed. Installing...${NC}"
		sudo apt install zenity -y
	fi

	#/*-  Check if nmap is installed
	if ! command -v nmap &> /dev/null; then
		echo -e "${RED}nmap does not appear to be installed. Installing...${NC}"
		sudo apt install nmap -y
	fi

	#/*-  Check if samba is installed
	if ! command -v smbclient &> /dev/null; then
		echo -e "${RED}Samba does not appear to be installed. Installing...${NC}"
		sudo apt install samba -y
	fi
}

#/*----------------------------------------------*/
#/*-  Function to check individual dependency
#/*----------------------------------------------*/
check_dependency() {
    local cmd=$1
    local name=$2
    
    if ! command -v "$cmd" &> /dev/null; then
        msg="$name was not found."
        msg+="\nPlease install it or verify it is on your path."
        msg+="\n\nOptionally, run this script from a command line with\n"
        msg+="the paramater of install to install all of them.\n\nExp: smblist.sh install"
        
        yad --info --text="$msg" --title="SMB Scanner" 
        exit 1
    fi
}

#/*----------------------------------------------*/
#/*-  Function to test if SMB is available on a host
#/*----------------------------------------------*/
test_smb() {
    local ip=$1
    
    # Try multiple SMB detection methods
    
    # Method 1: Test SMB port 445
    if timeout 2 nc -z "$ip" 445 2>/dev/null; then
        return 0
    fi
    
    # Method 2: Try smbclient with different options
    if timeout 3 smbclient -L "//$ip" -N &>/dev/null; then
        return 0
    fi
    
    # Method 3: Try with SMB2/3 protocol
    if timeout 3 smbclient -L "//$ip" -N --option='client min protocol=SMB2' &>/dev/null; then
        return 0
    fi
    
    # Method 4: Try with guest access
    if timeout 3 smbclient -L "//$ip" -U guest%'' &>/dev/null; then
        return 0
    fi
    
    # Method 5: Check for NetBIOS name (indicates Windows)
    if timeout 2 nmblookup -A "$ip" 2>/dev/null | grep -q '<00>'; then
        return 0
    fi
    
    return 1
}

#/*----------------------------------------------*/
#/*-  Function to get hostname and description
#/*----------------------------------------------*/
get_host_info() {
    local ip=$1
    local hostname="host-$ip"
    local description="Unknown Host"
    local os_info=""
    
    # Try to get NetBIOS name and info
    netbios_info=$(timeout 3 nmblookup -A "$ip" 2>/dev/null)
    if [ $? -eq 0 ]; then
        # Get computer name
        netbios_name=$(echo "$netbios_info" | grep -E '^\s+[A-Z0-9-]+\s+<00>' | head -1 | awk '{print $1}' | tr '[:upper:]' '[:lower:]')
        if [ ! -z "$netbios_name" ]; then
            hostname="$netbios_name"
        fi
        
        # Determine OS type from NetBIOS info
        if echo "$netbios_info" | grep -q '<20>'; then
            description="Windows Server"
        elif echo "$netbios_info" | grep -q '<00>'; then
            description="Windows Machine"
        fi
    fi
    
    # Try SMB OS detection
    smb_os=$(timeout 3 smbclient -L "//$ip" -N 2>/dev/null | grep -i "OS=")
    if [ ! -z "$smb_os" ]; then
        if echo "$smb_os" | grep -qi "windows"; then
            description="Windows SMB Share"
        fi
    fi
    
    # Fallback to DNS lookup for hostname
    if [ "$hostname" == "host-$ip" ]; then
        dns_name=$(timeout 2 nslookup "$ip" 2>/dev/null | grep -E 'name = ' | cut -d' ' -f3 | sed 's/\.$//')
        if [ ! -z "$dns_name" ]; then
            hostname="$dns_name"
            description="Network Host"
        fi
    fi
    
    echo "$hostname|$description"
}

#/*----------------------------------------------*/
#/*-  Function to scan network
#/*----------------------------------------------*/
scan_network() {
    echo -e "${BLUE}Auto-detected network: $NETWORK${NC}"
    echo -e "${BLUE}Scanning for SMB shares...${NC}"
    
    # Show progress with zenity if available, otherwise use simple progress
    if command -v zenity &> /dev/null; then
        {
            echo "10" ; echo "# Finding active hosts..."
            active_hosts=$(nmap -sn $NETWORK 2>/dev/null | grep -oE '[0-9]+\.[0-9]+\.[0-9]+\.[0-9]+' | grep -v $(echo $NETWORK | cut -d'/' -f1))
            
            echo "30" ; echo "# Checking SMB connectivity..."
            # Clear cache file
            > "$CACHE_FILE"
            
            host_count=$(echo "$active_hosts" | wc -w)
            current=0
            
            for ip in $active_hosts; do
                current=$((current + 1))
                progress=$((30 + (current * 60 / host_count)))
                echo "$progress" ; echo "# Scanning $ip..."
                
                if test_smb "$ip"; then
                    host_info=$(get_host_info "$ip")
                    hostname=$(echo "$host_info" | cut -d'|' -f1)
                    description=$(echo "$host_info" | cut -d'|' -f2)
                    
                    echo "$ip|$hostname|$description|smb://$ip" >> "$CACHE_FILE"
                fi
            done
            
            echo "100" ; echo "# Scan complete!"
        } | zenity --width 400 --progress --title="SMB Network Scanner" --text="Scanning..." --auto-close
    else
        # Fallback to console output
        echo -e "${YELLOW}Finding active hosts...${NC}"
        active_hosts=$(nmap -sn $NETWORK 2>/dev/null | grep -oE '[0-9]+\.[0-9]+\.[0-9]+\.[0-9]+' | grep -v $(echo $NETWORK | cut -d'/' -f1))
        
        # Clear cache file
        > "$CACHE_FILE"
        
        echo -e "${YELLOW}Checking SMB connectivity...${NC}"
        for ip in $active_hosts; do
            echo -n "Scanning $ip... "
            if test_smb "$ip"; then
                host_info=$(get_host_info "$ip")
                hostname=$(echo "$host_info" | cut -d'|' -f1)
                description=$(echo "$host_info" | cut -d'|' -f2)
                
                echo -e "${GREEN}SMB available - $hostname${NC}"
                echo "$ip|$hostname|$description|smb://$ip" >> "$CACHE_FILE"
            else
                echo -e "${RED}No SMB${NC}"
            fi
        done
    fi
}

#/*----------------------------------------------*/
#/*-  Function to show YAD dialog
#/*----------------------------------------------*/
show_dialog() {
    if [ ! -f "$CACHE_FILE" ] || [ ! -s "$CACHE_FILE" ]; then
        yad --info --text="No SMB hosts found.\nClick 'Scan Network' to search for hosts." --title="SMB Scanner"
        return
    fi
    
    # Create simple menu from cache file
    yad_options=()
    while IFS='|' read -r ip hostname description smb_url; do
        yad_options+=("$hostname ($ip)" "$smb_url")
    done < "$CACHE_FILE"
    
    # Show menu dialog
    selection=$(yad --list \
        --title="SMB Network Browser" \
        --text="Select an SMB host to connect:" \
        --column="Host" \
        --column="URL:HD" \
        --width=500 \
        --height=300 \
        --button="Scan Network:2" \
        --button="Connect:0" \
        --button="Cancel:1" \
        --hide-column=2 \
        --print-column=2 \
        "${yad_options[@]}")
    
    ret=$?
    case $ret in
        0) # Connect
            if [ ! -z "$selection" ]; then
                smb_url=$(echo "$selection" | tr -d '|')
                echo -e "${GREEN}Connecting to: $smb_url${NC}"

	            #Changed the call from a direct FM to using the xdg-open for default
                xdg-open "$smb_url"  >/dev/null 2>&1 &
                sleep 2
		        exit 0
            fi
            ;;
        2) # Scan Network
            scan_network
            show_dialog
            ;;
        *) # Cancel/Close
            exit 0
            ;;
    esac
}

#/*----------------------------------------------*/
#/*-  Function to show alternative ( simple )
#/*-  menu function
#/*-  May need this to show instead - two strange
#/*-  visuals on several test machines
#/*----------------------------------------------*/
show_simple_menu() {
    if [ ! -f "$CACHE_FILE" ] || [ ! -s "$CACHE_FILE" ]; then
        yad --info --text="No SMB hosts cached.\nRun: $0 scan" --title="SMB Scanner"
        return
    fi
    
    # Build menu options
    menu_text=""
    count=1
    declare -A urls
    
    while IFS='|' read -r ip hostname description smb_url; do
        menu_text+="$count) $hostname ($ip) - $description\n"
        urls[$count]="$smb_url"
        count=$((count + 1))
    done < "$CACHE_FILE"
    
    choice=$(echo -e "$menu_text" | yad --list \
        --title="SMB Network Browser" \
        --text="Double-click to connect:" \
        --column="Available SMB Hosts" \
        --width=600 \
        --height=300 \
        --button="Rescan:2" \
        --button="Close:1")
    
    ret=$?
    if [ $ret -eq 0 ] && [ ! -z "$choice" ]; then
        # Extract number from choice
        num=$(echo "$choice" | cut -d')' -f1)
        if [ ! -z "${urls[$num]}" ]; then
            echo -e "${GREEN}Opening: ${urls[$num]}${NC}"
            xdg_open "${urls[$num]}"  >/dev/null 2>&1 &
			
			# on KDE we need this to release the connection
            sleep 2
		    exit 0
        fi
    elif [ $ret -eq 2 ]; then
        scan_network
        show_simple_menu
    fi
}

#/*----------------------------------------------*/
#/*-  Function to show quick connect dialog
#/*----------------------------------------------*/
quick_connect() {
    ip=$(yad --entry \
        --title="Quick SMB Connect" \
        --text="Enter IP address:" \
        --entry-text="$(echo $NETWORK | cut -d'/' -f1 | sed 's/\.0$/./')")
    
    if [ $? -eq 0 ] && [ ! -z "$ip" ]; then
        smb_url="smb://$ip"
        echo -e "${GREEN}Connecting to: $smb_url${NC}"
        xdg-open "$smb_url" >/dev/null 2>&1 &
        sleep 2
		exit 0
    fi
}

#/*----------------------------------------------*/
#/*-  Function to check all dependencies
#/*----------------------------------------------*/
check_all_dependencies() {
    #/*-  Check if YAD is installed
    if ! command -v yad &> /dev/null; then
        echo -e "${RED}YAD is not installed. Installing...${NC}"
        sudo apt install yad -y
    fi

    check_dependency "zenity" "zenity"
    check_dependency "nmap" "nmap"  
    check_dependency "smbclient" "Samba"
}


#/*----------------------------------------------*/
#/*----------------------------------------------*/
#/*-           Main Script Logic                -*/
#/*----------------------------------------------*/
#/*----------------------------------------------*/

#/*- Check if we want to install dependencies first
if [ "$1" = "install" ]; then
    install_dependencies
    exit 0
fi

#/*- Setup variables and environment
CACHE_DIR="$HOME/.cache/smb_scanner"
CACHE_FILE="$CACHE_DIR/hosts.cache"
mkdir -p "$CACHE_DIR"

#/*- Auto-detect network (or set manually)
AUTO_NETWORK=$(ip route | grep -E '^[0-9]+\.[0-9]+\.[0-9]+\.[0-9]+/[0-9]+' | head -1 | awk '{print $1}')
if [ ! -z "$AUTO_NETWORK" ]; then
    NETWORK="$AUTO_NETWORK"
else
    # Fallback: assume /24 from current IP
    MY_IP=$(hostname -I | awk '{print $1}')
    NETWORK=$(echo "$MY_IP" | sed 's/\.[0-9]*$/.0\/24/')
fi

#/*- setup Output Colors
RED='\033[0;31m'
GREEN='\033[0;32m'
YELLOW='\033[1;33m'
BLUE='\033[0;34m'
NC='\033[0m' # No Color

#/*- Check all required dependencies
check_all_dependencies

#/*- Main command line processing and execution
case "$1" in
    scan)
        scan_network
        show_dialog
        ;;
    show)
        show_dialog
        ;;
    simple)
        show_simple_menu
        ;;
    quick)
        quick_connect
        ;;
    install)
        install_dependencies
        ;;
    *)
        if [ -f "$CACHE_FILE" ] && [ -s "$CACHE_FILE" ]; then
            show_dialog
        else
            echo -e "${YELLOW}No cached results. Scanning network...${NC}"
            scan_network
            show_dialog
        fi
        ;;
esac

You do not have the required permissions to view the files attached to this post.
*QSI = Quick System Info from menu (Copy for Forum)
*MXPI = MX Package Installer
*Please check the solved checkbox on the post that solved it.
*Linux -This is the way!

Post Reply

Return to “Documentation and videos”